
Wednesday, May 5, 2010
Interactive Spreadsheet Quiz
Do you have to have your students take a vocabulary quiz? You can make one rather easily using Microsoft Excel. Here is a screenshot of a quiz I made on basic color theory vocabulary. The students can type the correct vocab word into the cell and press enter. The quiz will tell them if their answer is correct or incorrect by using a formula to say "Good" if the answer is correct and "uh-oh" if the answer is incorrect. The quiz will also track the student's points earned for each correct answer. This format allows the students to take the quiz as many times as they desire until they get the score that the desire. This format also allows for easy grading on the teacher's part.

WebQuests
The inspiration for my WebQuest began with a lesson plan I have for self-portraits where students wear a hat and paint themselves. In preparing the introduction material, I found myself researching online famous paintings with hats in them. I thought that it might be nice to incorporate my students in this research process, and thus, my WebQuest was born! 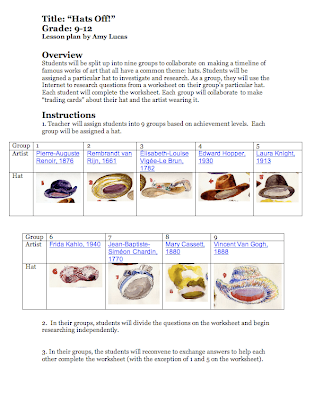


Sunday, May 2, 2010
Documenting Student Work
As art teachers, one thing that we are responsible for is documenting our students work. With a digital camera, dry erase board and an afternoon, art teachers (even homeroom teachers) can now document students work to help the grading process go smoother and show off the students progress online.
Step One:
Set up the digital camera on a tripod and manipulate the lighting to compliment the student's work.
Step Two:
Measure and draw corners on a magnetic dry erase board to help yourself know where the piece should be placed to be within the frame of the camera. This will make the process go a lot faster because you won't have to adjust the camera every time you photograph a new students work.
Step Three:
Allow a several inch margin on the bottom of the camera frame area to write the class's homeroom teacher's name and grade. Below that, you can write the student's name using a dry erase marker. This will help you identify what student's work you are viewing and will have an automatic caption if you decide to post the pictures in a google presentation saving you time and energy.
Step Four:
When you go from student to student, use your corners to know where to put the piece and make sure you change the student's name on the dry erase board.
Step Five:
Upload the pictures to your computer. You can organize them by a file for each homeroom teacher and have subfiles for each project the students complete. Now that the pictures are on your computer and in a file, you can use them to create a google presentation. You can post the presentation on your classroom blog to show the parents what the students have been up to in your classroom.
Happy Documenting!
Helping Students Study for Art History
As a student, I often wondered why teachers would make it so difficult for students to study for art history tests. On a Friday they would say "learn these fifty something pieces and the test will be at 8 am sharp on Monday, good luck!" I would spend more time making study guides and charts than I did learning the actual material. I would use a mac based program called Pages to make my study guides. I understand that students can learn a lot through doing, but I feel like as teachers, we need to make the "doing" process as efficient as possible so students can spend more time mastering the material.
Consider giving the students the framework and letting them put in the information from their notes. If we have to make a powerpoint to teach our lectures efficiently, we could just as easily give our students a document that they could type in their lecture notes and or print it off and hand write their notes in the blank area. It saves time for students to transfer the information from lecture notes to a study guide, while still allowing them to learn by doing. It also saves the teacher lots of time during lecturing to address numerous questions on things like the spelling of an artist's name, when the movement took place exactly, etc. Here are some screen shots of study guides I have made for art history tests:
Here is an example of an information sheet that teachers could give to students. Each movement is assigned a color and an abbreviation to help the students remember the movement. The teacher also provides the date so there is no confusion about when the movement occurred.

Here is what the same information sheet looks like after the student types their lecture notes back into the study guide.

Here is an example of the blank template the students would receive before lecture. Each piece gets a page. The teacher provides the title (in the movements color), movement abbreviation, artist (in all caps), piece name and picture of the piece.

Here is what the same sheet looks like after the student has filled in the template with your lecture notes.

Subscribe to:
Comments (Atom)
